
Managing Papers With Zotero And Personal File Server
Managing Papers With Zotero For Free Using Caddy And Tailscale
TL;DR: This guide demonstrates how to setup secure remote storage for Zotero without needing to rely on cloud storage. Jump to the how to setup secure storage section for how to do this.
Motivation
Reading a large volume of papers is essential to stay up to date on recent work and also as a potential source of new ideas. Reading papers is a nice low-overhead way to have a challenging dialogue with the authors, which can often lead to gaining a new perspective, and sometimes coming up with a new idea not previously imagined by the authors. Often, reading occurs on the go without a laptop available. Devices may include a tablet or simply a phone in a crowded subway. A solution is needed to track reading lists and switch between devices easily.

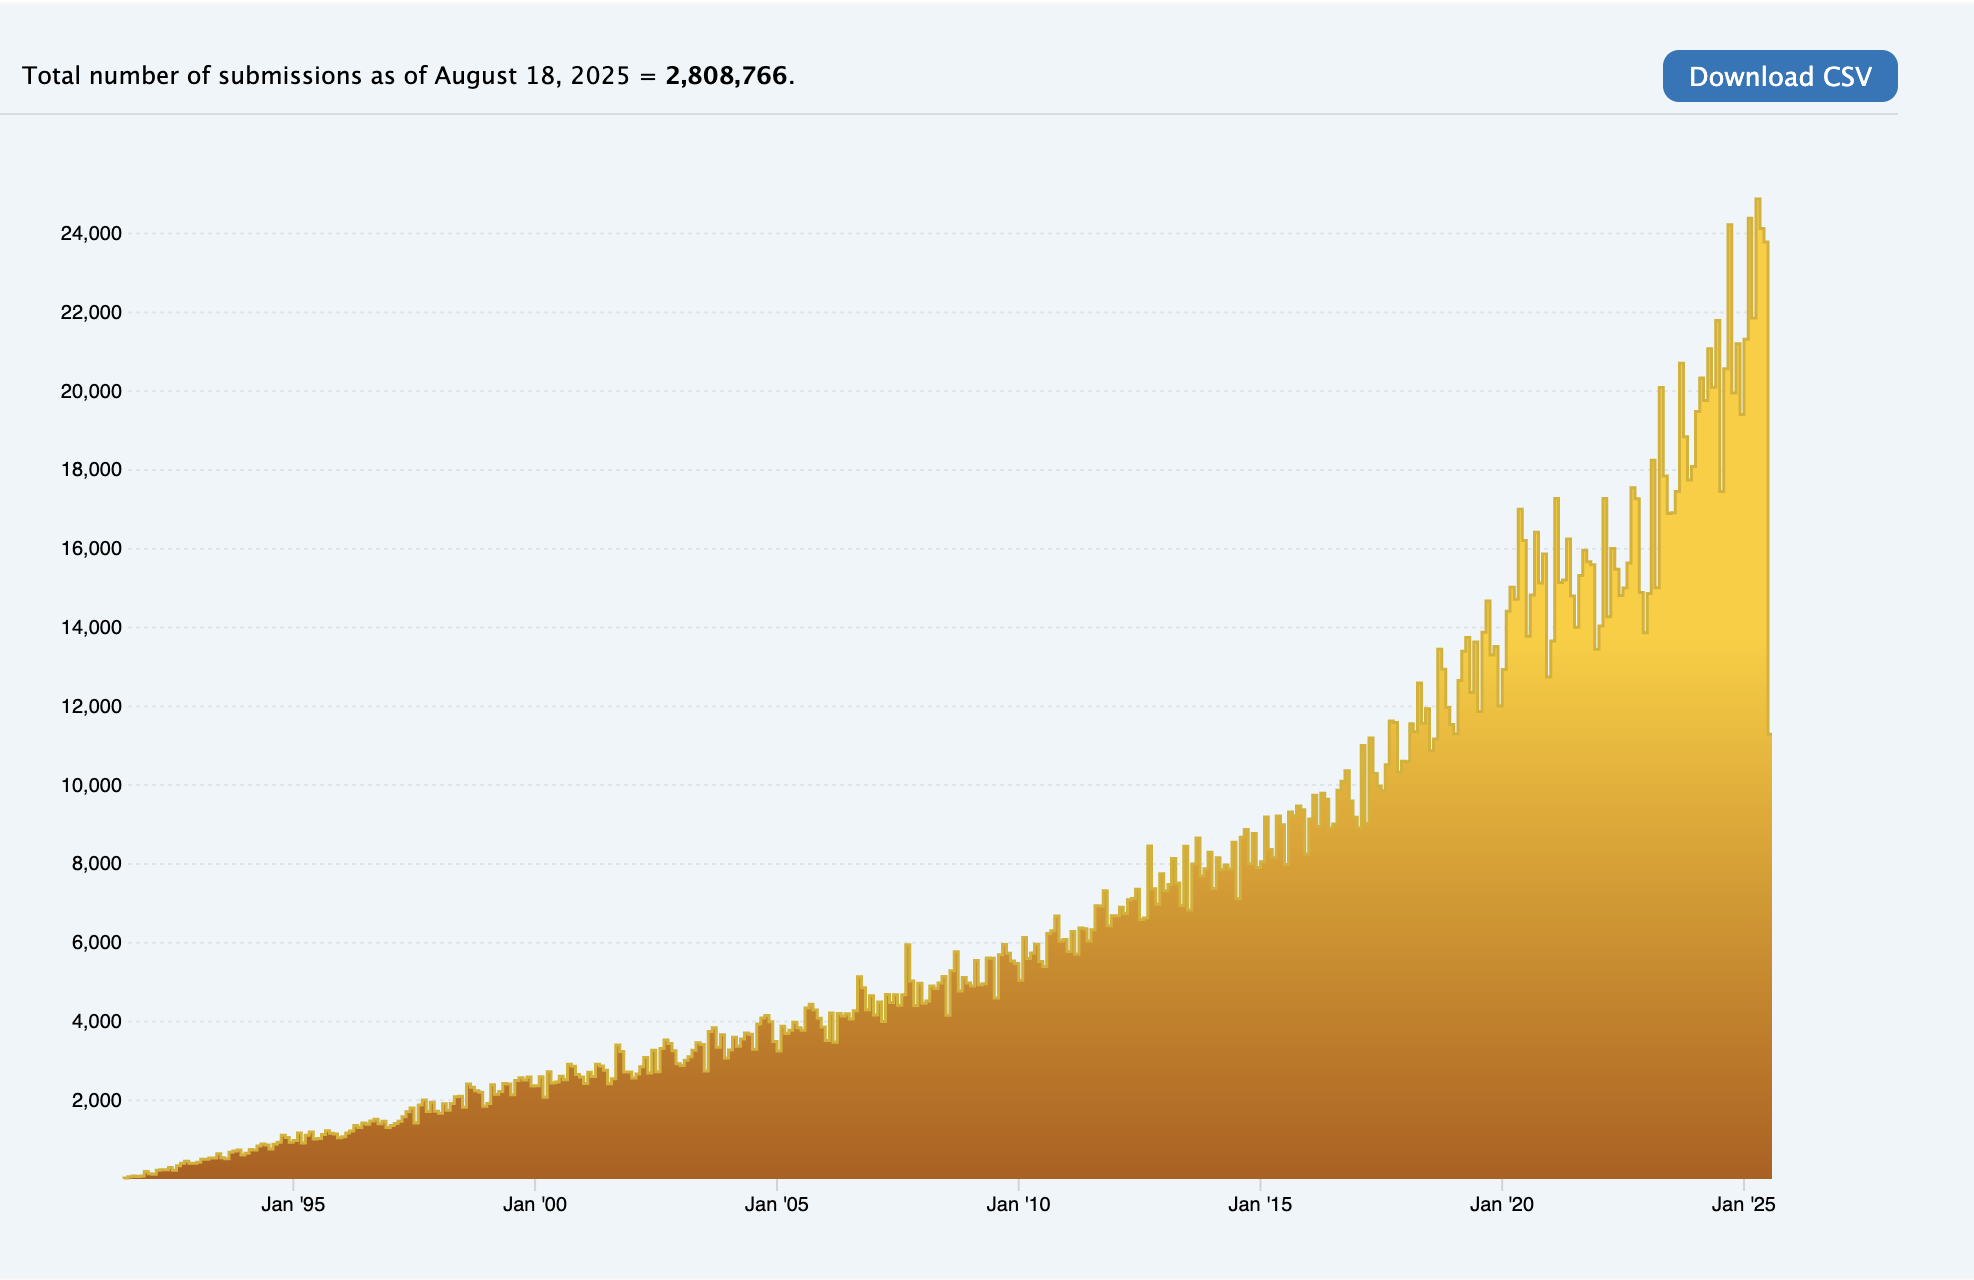
Previously, a simple setup using Apple Books and iCloud (for storage) was utilized. However, the collection has grown to a point where it’s hard to keep track and search through previous papers. It also doesn’t help that the number of papers published per month grows exponentially, with arXiv for example almost doubling in 2020 (at about 14000) to 24000 in 2025:
 .
.
The current collection stands at 432 PDFs, and Apple Books combined with paper note-taking is no longer sufficient.
The New Setup
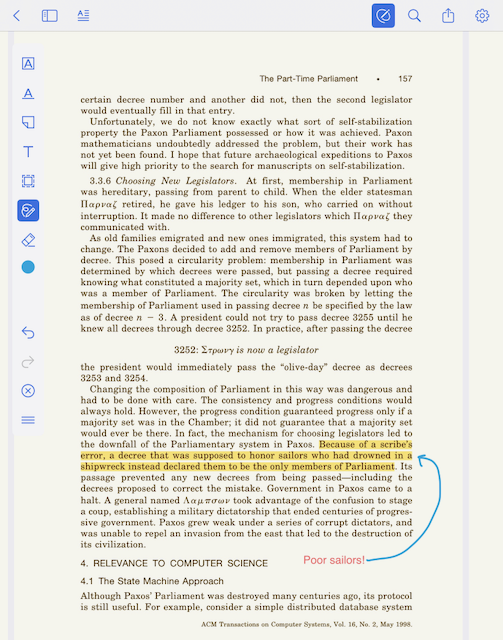
This led to the need for a better solution. After doing some reading, Zotero was found to meet all requirements. For additional note taking and tracking of papers, Notion, with the combination of a Notero Plugin to sync Zotero files into Notion was found to satisfy these needs. See this nice blog post on how to get the two setup together. Annotation is possible in Zotero:
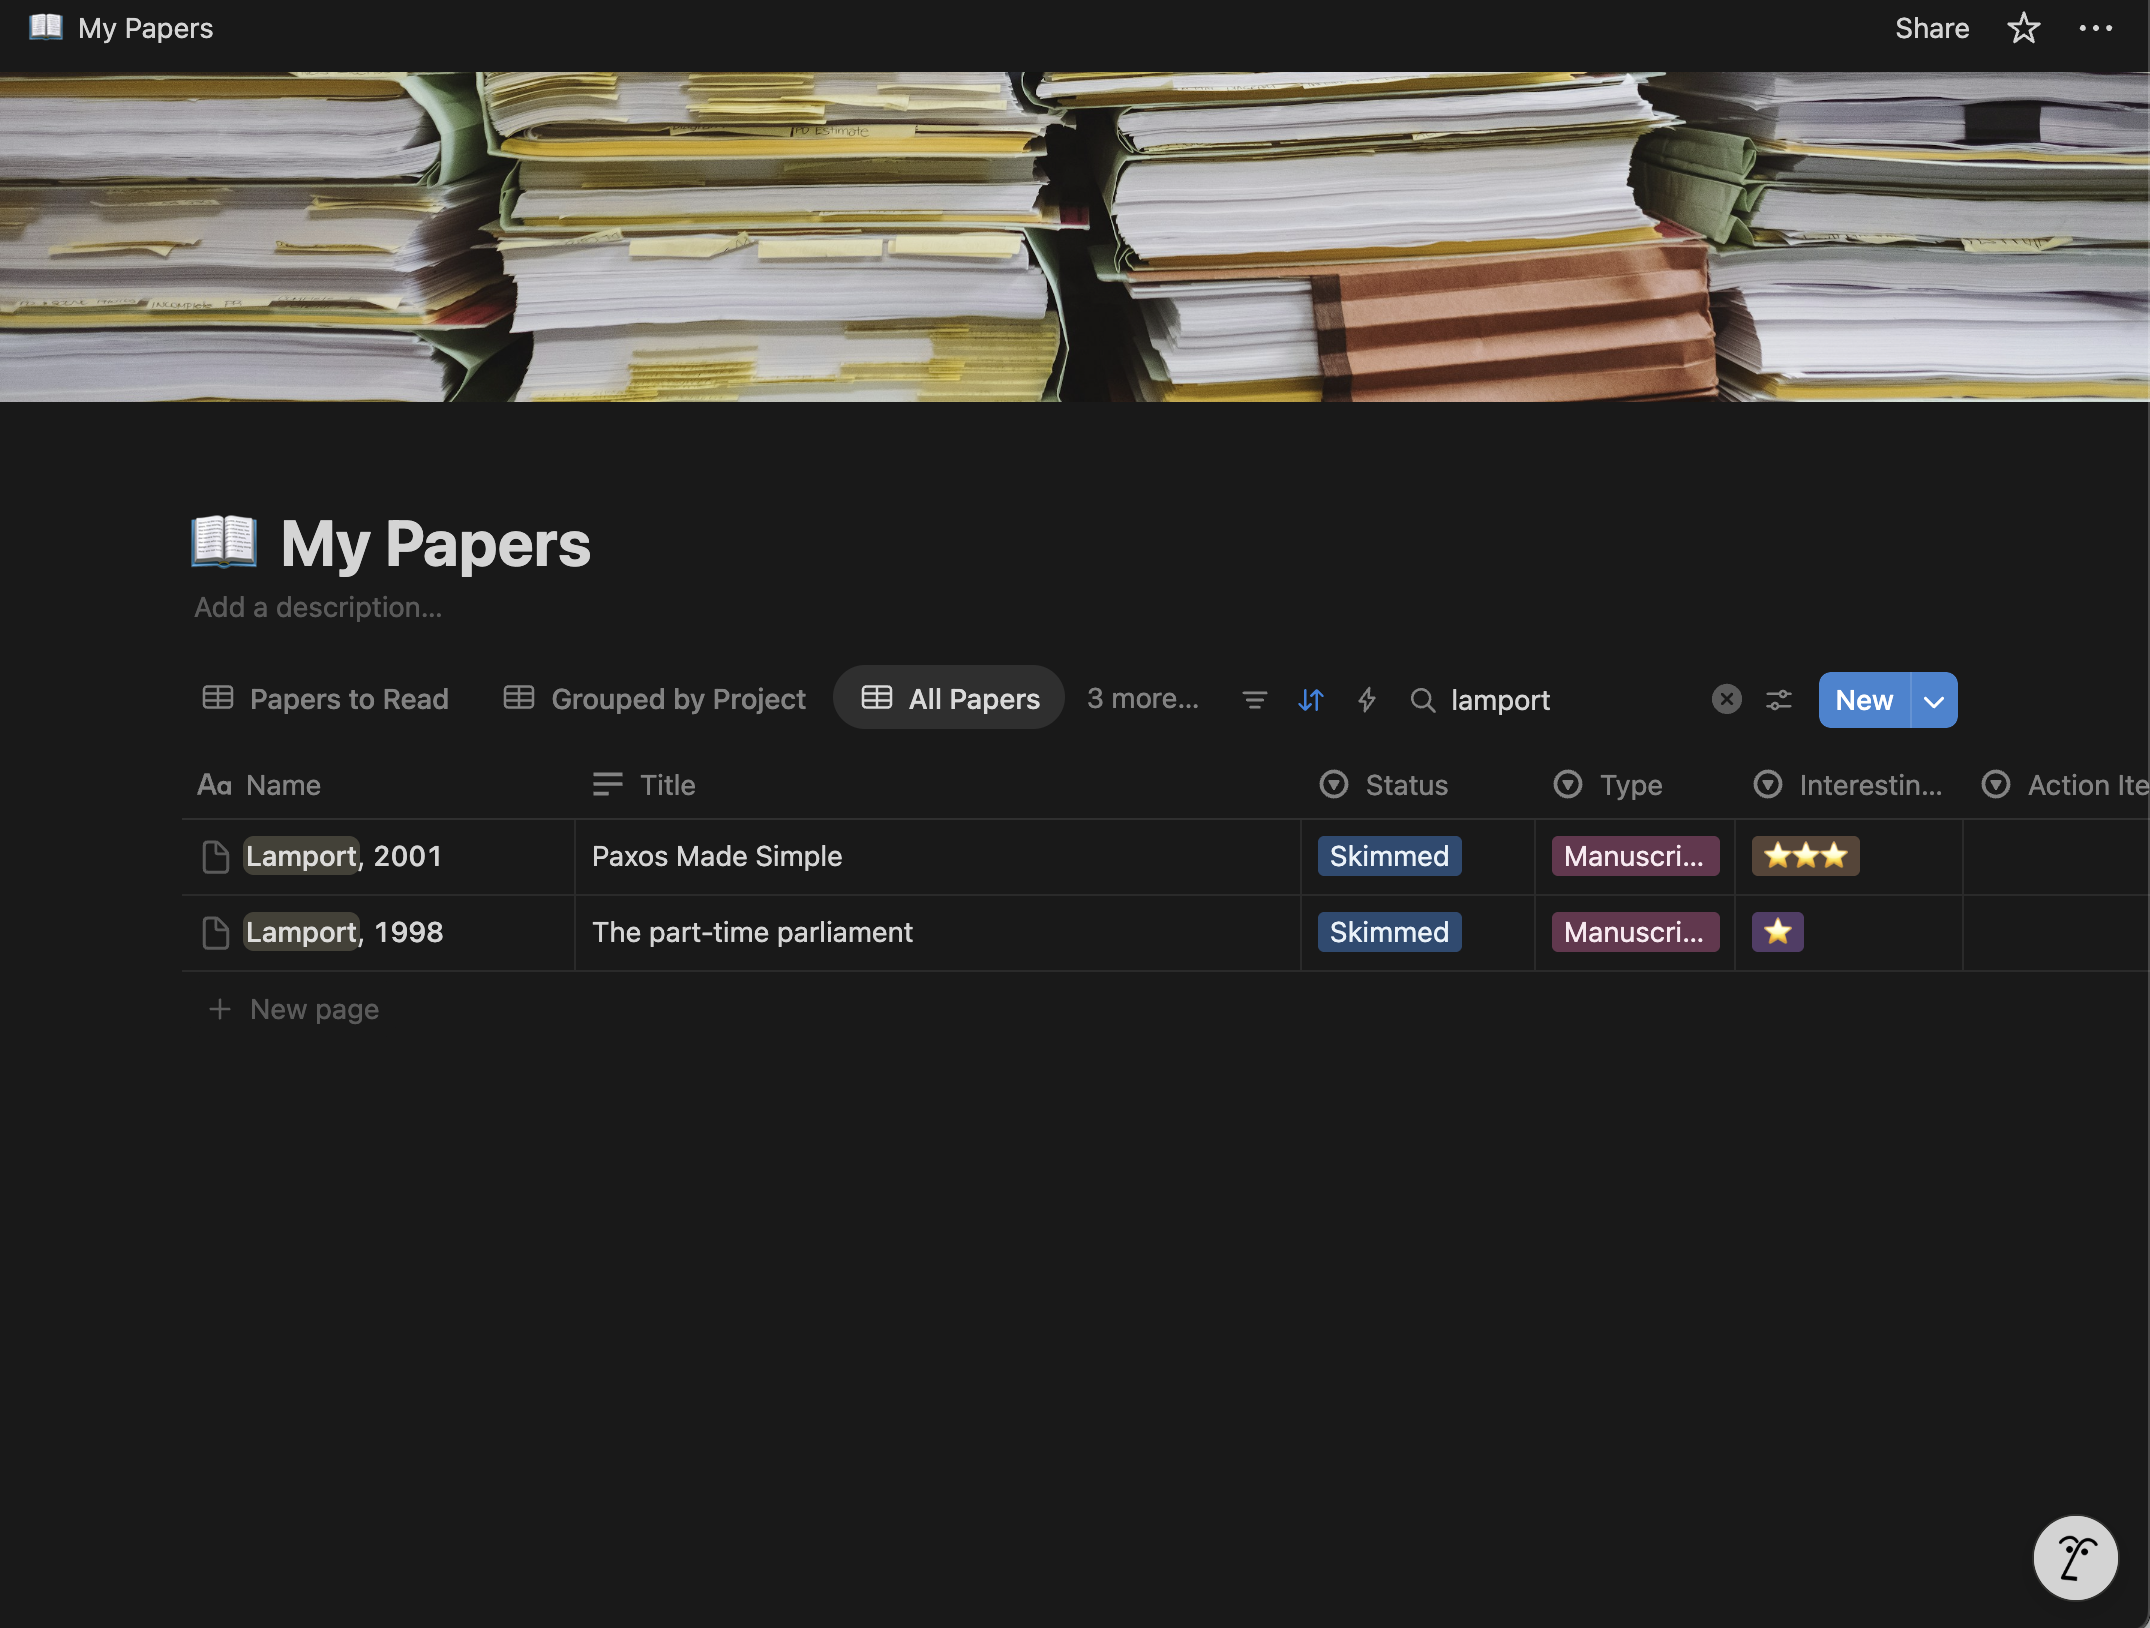
And adding a pdf to Zotero automatically adds it to Notion:
With Page view:
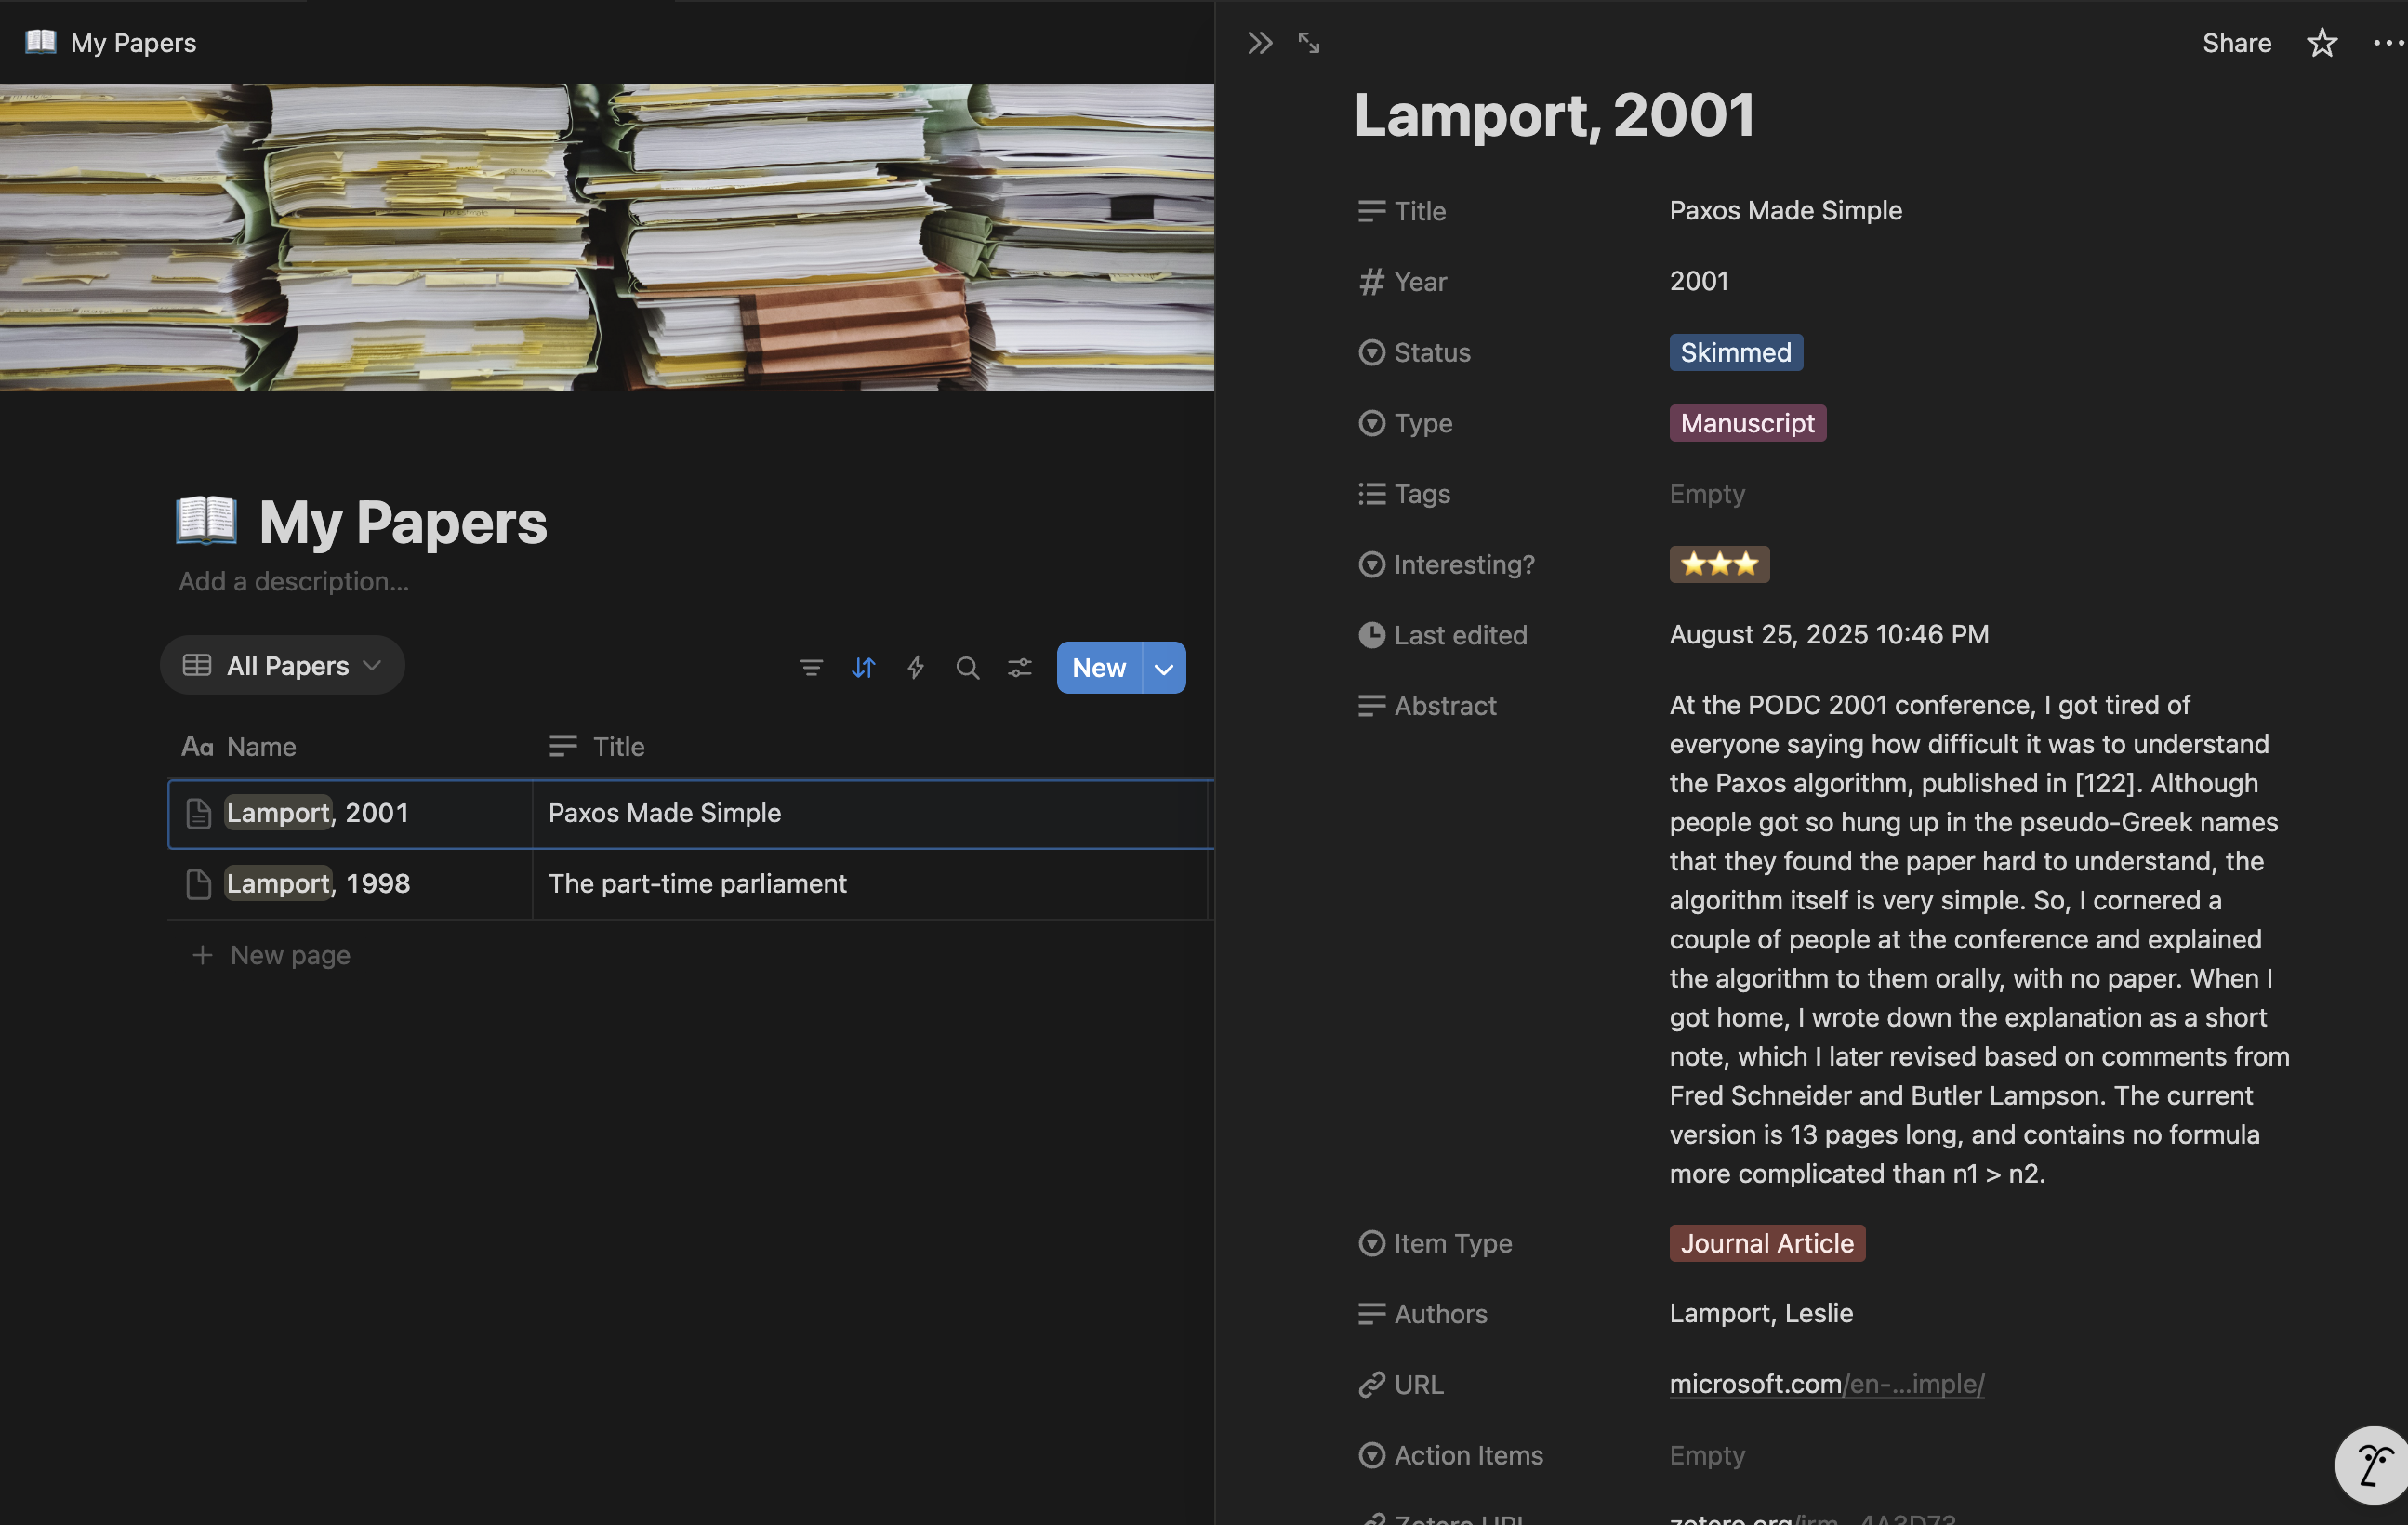
And a notes section that can be added to:

The Problem
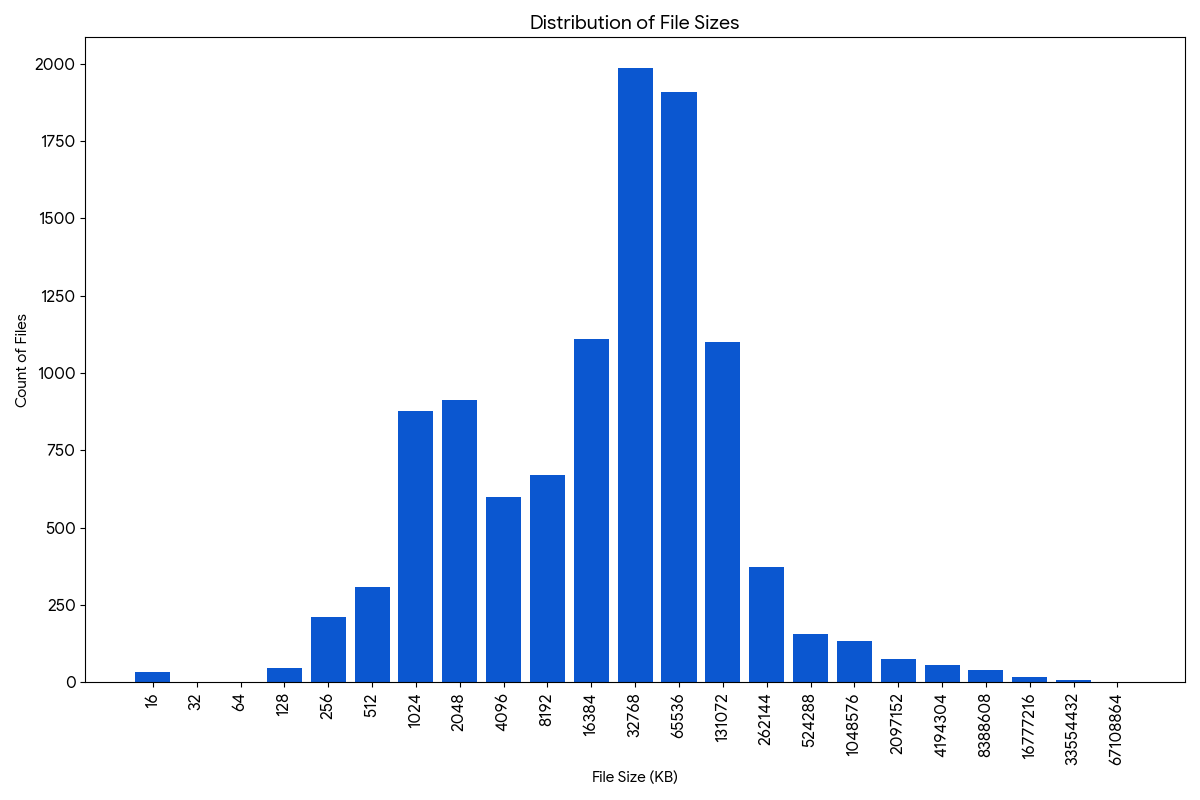
Unfortunately, after getting these setup, an additional problem was encountered. The 432 PDFs total 2.4GB with this file size distribution (note the x-axis is logarithmic, in powers of two) 1:
The storage is a problem with Zotero as payment is requiredfor storage past 300MB. Committing to paid storage was not yet desirable, leading to a search for a better alternative. Zotero does allow for using an alternate storage option so long as it supports the WebDAV protocol. As a matter of fact, they list free providers here. However, the storage options remain too small, given the current usage of 2.4GB of mostly papers.
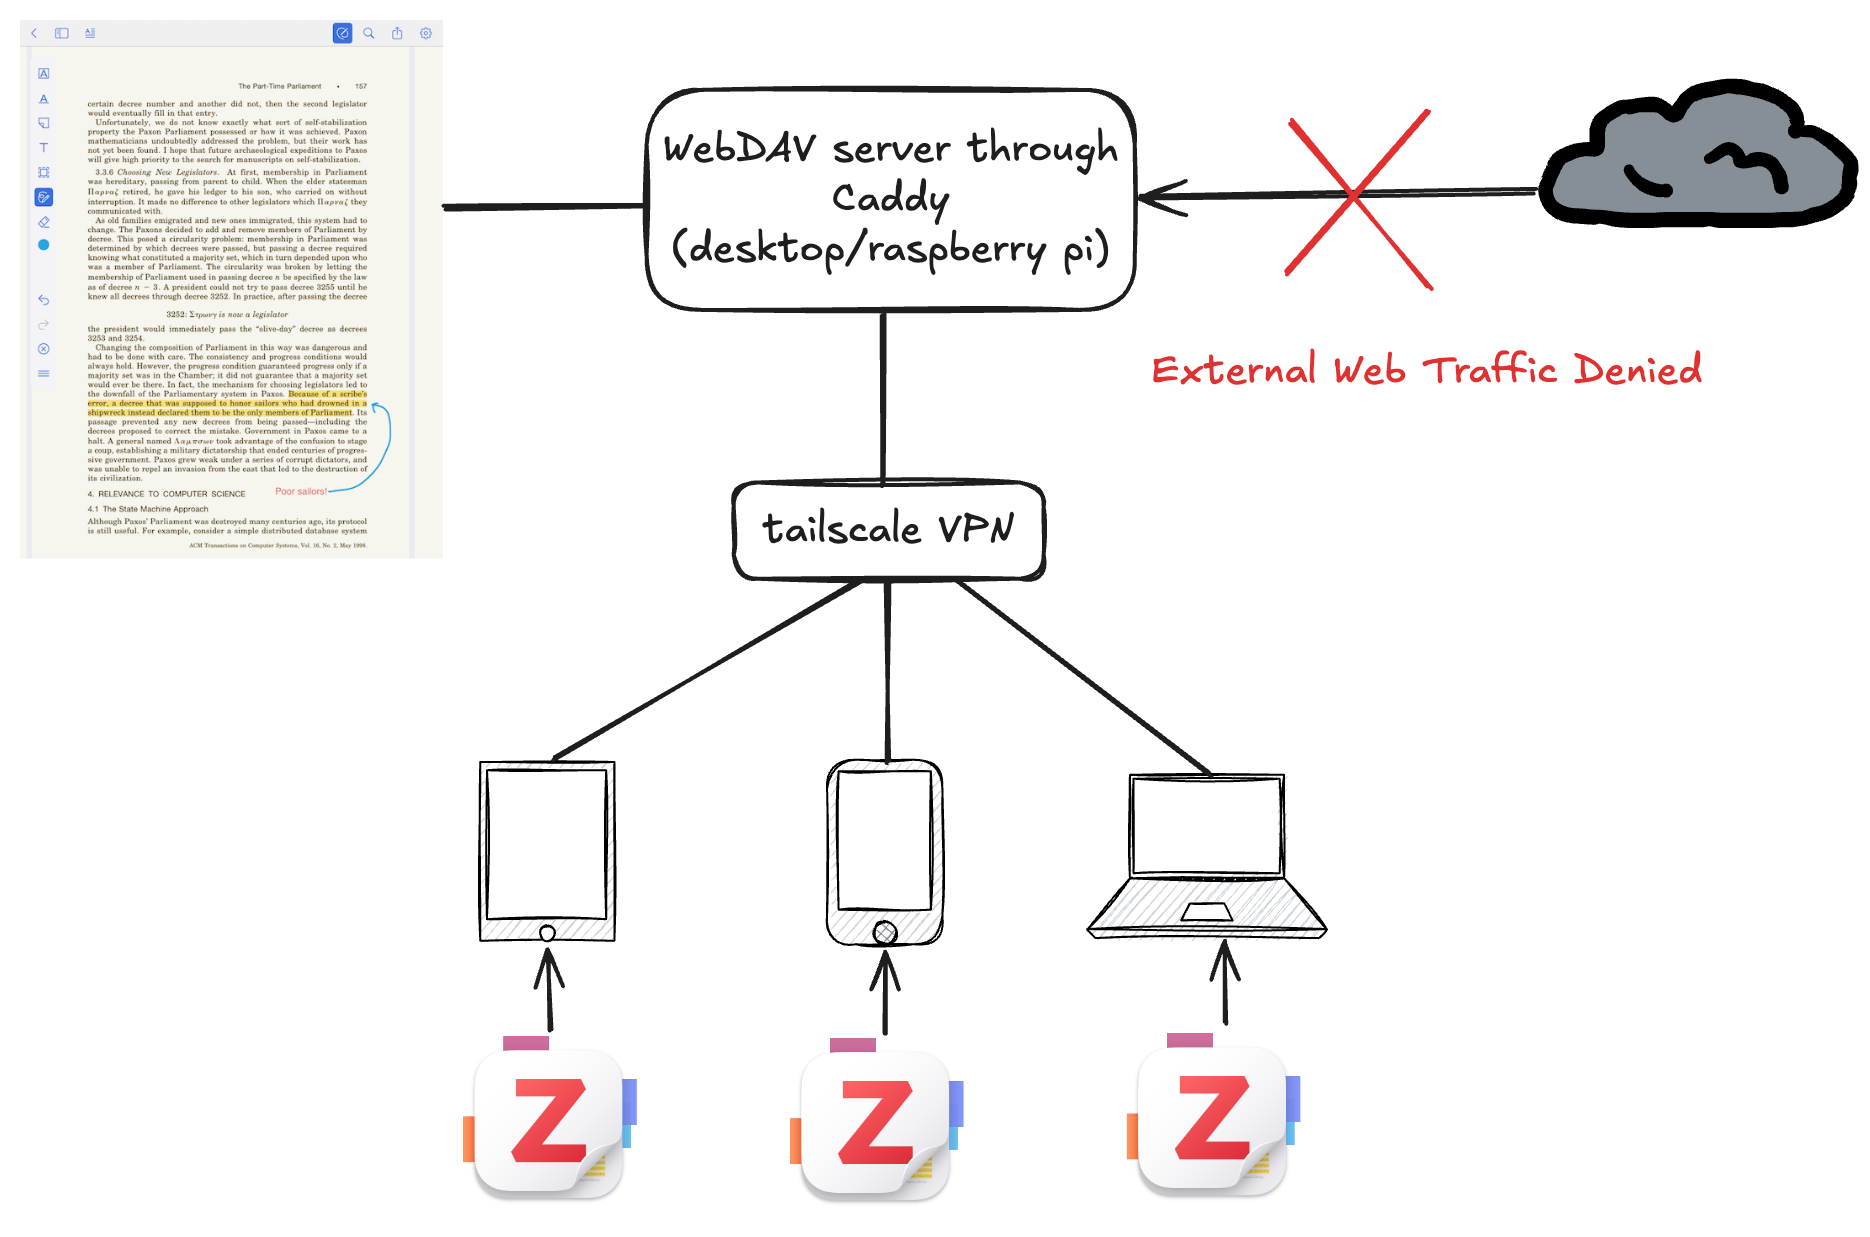
Given it’s pretty easy to switch storage servers with Zotero, it was decided to run this out of a home server for now. However, doing so poses great risk and most of the work in getting this done right has nothing to do with the webserver itself but the security around it. This post will demonstrate how to accomplish this in a secure way.
How to Setup Your Own Secure Storage
Step 1: Choose A Server
A server is required. It can be as simple as a raspberry pi connected to a 64GB usb drive, depending on preference.
Step 2: Install Tailscale On All Connected Devices
Get tailscale. It’s free and quite powerful. Installation is required on both the device that hosts the webDAV server and the devices that connect to it.
On the Tailscale network, devices will have names like machine-name.tailnet-name.ts.net.
TIP: Naming devices something simple is recommended, like workstation or
raspberrypi. Try avoiding personally identifiable information like johndoe
as this information will appear in a public ledger of https certificates (see
here).
Step 3: Get an HTTPS certificate for your server
Ipads (and possibly other devices) only allow https connections. This means the web server will need to provide a certificate that was issued by a certificate authority that the client device already trusts2. Fortunately, tailscale allows for generating certificates through Let’s Encrypt This only needs to be run on the server that will host the webdav service.
-
Enable https certificates for the tailnet here.
-
On the machine that will serve the files, run:
tailscale cert
to get the machine name, then
sudo tailscale cert machine-name.tailnet-name.ts.net
with the machine name and tailnet name obtained from the previous step information.
NOTE: This will only create a cert once, which at the time of this writing, are
valid for 90 days. When the cert expires, the command tailscale cert can be
called again or optionally, this
extension can be installed.
Step 4: Lock Down Your Server
DO NOT SKIP THIS STEP
Running a server that accepts requests from anyone, even on a local network is extremely risky. Fortunately, since the Tailscale VPN is used which is already doing the security heavy lifting, this concern is mitigated. Firewall rules that only accept incoming requests from the VPN itself can be added. See this document for more details.
It will recommend using UFW (Uncomplicated Firewall) and the steps are:
1. Enable the firewall
sudo ufw enable
2. Deny everything incoming
# deny all incoming by default
sudo ufw default deny incoming
sudo ufw default allow outgoing
3. List all rules (to find the tailscale one)
sudo ufw status verbose
4. Allow connections from the tailscale vpn (which should be tailscale0)
sudo ufw allow in on tailscale0
Restart everything
sudo ufw reload
sudo service ssh restart
NOTE: Please do not skip this step unless the process is fully understood. The web is dangerous.
Step 5: Install caddy
Instructions can be found here.
For example for ubuntu: sudo apt install caddy.
Step 6: Allow Caddy access to tailscale certificates
In the configuration file /etc/default/tailscaled for the tailscale daemon, add this line:
TS_PERMIT_CERT_UID=caddy
This will give the caddy user (which caddy should run as) permission to access
the certificates from tailscale. Interestingly, caddy out of the box knows to
try to do this when it sees domains that end in *.ts.net, so nothing else
needs to be done (see
here).
After this edit, ensure the daemon is restarted. For example, using systemd:
sudo systemctl restart tailscaled
Step 7: Add webdav plugin to caddy
sudo caddy add-package github.com/mholt/caddy-webdav
(From instructions here).
Step 8: Edit the Caddyfile
Caddy’s configuration file is located in /etc/caddy/Caddyfile.
Add these lines to it:
# configure webdav module
{
    order webdav before file_server
}

# add webdav.
# (Note the 443 is optional as it's the default, but provides clarity)
machine-name.tailnet-name.ts.net:443 {
  # set up webdav for the host
  handle_path /webdav/* {
    root * /data/webdav
    webdav
    basicauth {
        user some-password-hash
    }
  }
}
replace some-password-hash with the hash of the desired password. You can get it by running:
caddy hash-password
and pasting that output.
NOTE: The password protection is not necessary for security. It is only here to help prevent accidental requests into the webdav server which are pretty easy to make.
(Again from instructions here).
NOTE: The nested handle_path can be removed if preferred:
machine-name.tailnet-name.ts.net {
  root * /data/webdav
  webdav
  basicauth {
      user some-password-hash
  }
}
The handle_path directive is used so that the address to the webdav server will be https://machine-name.tailnet-name.ts.net/webdav and not https://machine-name.tailnet-name.ts.net. This is done because the https server points to multiple servers (webdav is one, but code-server is another).
Step 9: Restart Caddy
sudo systemctl restart caddy
Step 10: Test the webdav connection
Just listing should be fine:
$ curl -X PROPFIND -u "user:pass" https://my-machine.tailnet-name.ts.net/webdav/
(or remove the webdav/ suffix if the handle_path directive wasn’t used).
Step 11: Add this to Zotero
For example:
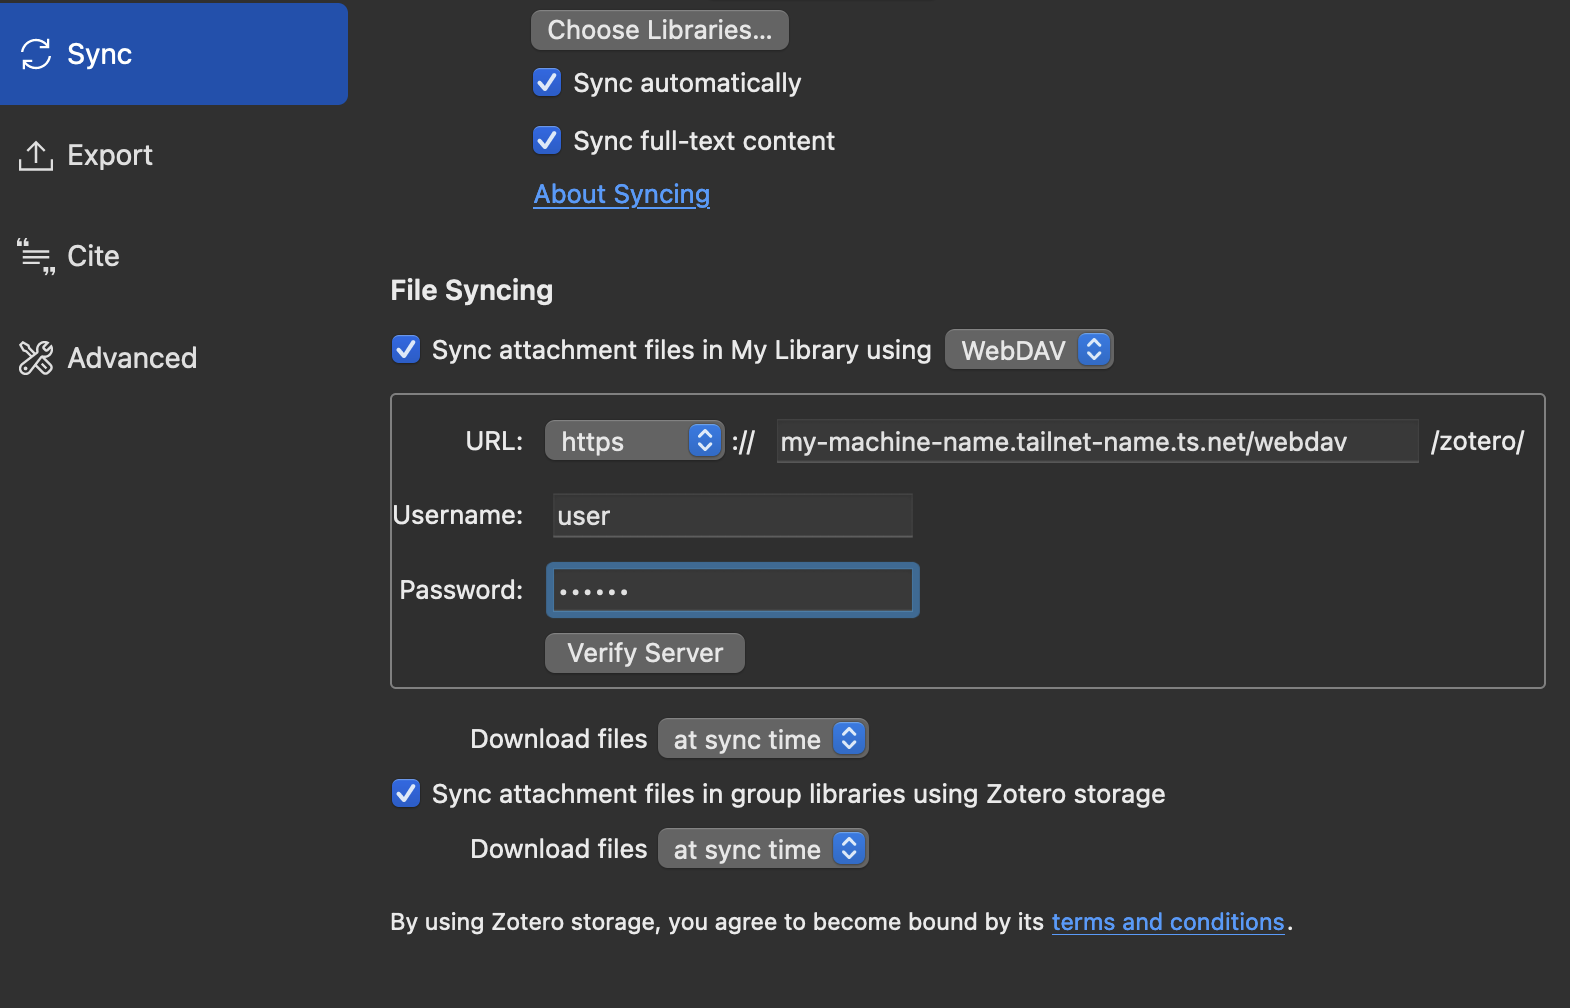
This should work just fine across all connected devices!
Discussion
Why Caddy?
The goto choice for a webdav server tends to be apache2. Caddy was chosen solely for the fact that it has a built in integration with tailscale certificates.
Questions/Comments?
Writing instructions reveals that it’s extremely difficult to get all the details right so that it works for most people without sinking a lot of time into it.
If issues arise, please add any questions or comments in the comments section below. These are rough guidelines of what worked in this specific setup, but it’s possible details may have been missed that seemed obvious in context.
Better suggestions are welcome!
Thank you!
Future Plans
A general queue of to-read items that include links to the web and papers (while still keeping the advanced annotations and reference tracking that Zotero provides for papers) would be desired. Pocket was a preferred tool but unfortunately it shut down. Fortunately, it looks like a few alternatives have popped up, one that seems very promising is Readeck. It looks like someone requested zotero integration. Perhaps in the future this might be a nice way to integrate a generalized reading queue.
Citation
@misc{jlhermitte2025zoterostorage,
  title={Managing Papers With Zotero For Free Using Caddy And Tailscale},
  author={Julien R. Lhermitte},
  year={2025},
  howpublished={\url{https://jrmlhermitte.github.io/2025/08/17/managing-papers-with-zotero-and-personal-file-server.html}}
}
-
Yes, there are large pdfs, for example, Nymeria: A Massive Collection of Multimodal Egocentric Daily Motion in the Wild is a 50MB pdf, or a notable example, this 29MB pdf Generating Physically Stable and Buildable Brick Structures from Text. The top 4 are actually textbooks, with the largest at 152MB. ↩
-
It’s possible to install a self-signed certificate on an ipad. However, it’s a slightly involved manual process and not to mention risky. Building custom security is not recommended unless the risks are understood and the cost of proper monitoring is accepted. ↩