
Gemini Mcp
MCP With Gemini
MCP is a powerful protocol that enables LLMs to run tools. As seen in extensive literature, LLMs scale once they’re able to not only read from their environment, but change it.
There are two modes MCP can run in: stdio, or HTTP. The latter is just a standard HTTP server. The former is interesting as it uses stdin/stdout.
This post will demonstrate how to leverage the full power of MCP through Gemini series LLMs by adding a custom MCP server to Gemini CLI. Many such posts exist, but demonstrations on how Stdio works with real calls into it appear to be lacking. This guide addresses that gap.

Most of this has also been put in the readme here.
What this will not be about
This is geared towards home projects where one agent connected to a bunch of tools is helpful. This post will not go into setting up multiple agents. See Google’s Agent2Agent protocol for more information. See the ADK Library for some more details, or see this nice Hugging Face Tutorial on that.
Quick Setup
To begin with, ensure the proper tools are installed.
Recommendations include tools with minimal friction (e.g., uv), though any
preferred Python toolset is suitable.
1. Install UV
curl -LsSf https://astral.sh/uv/install.sh | sh
(linux and mac)
2. Initialize
Clone project and initialize virtualenv
git clone https://github.com/jrmlhermitte/gemini-mcp-example.git
cd gemini-mcp-example
uv sync
source .venv/bin/activate
Write MCP Server And Test
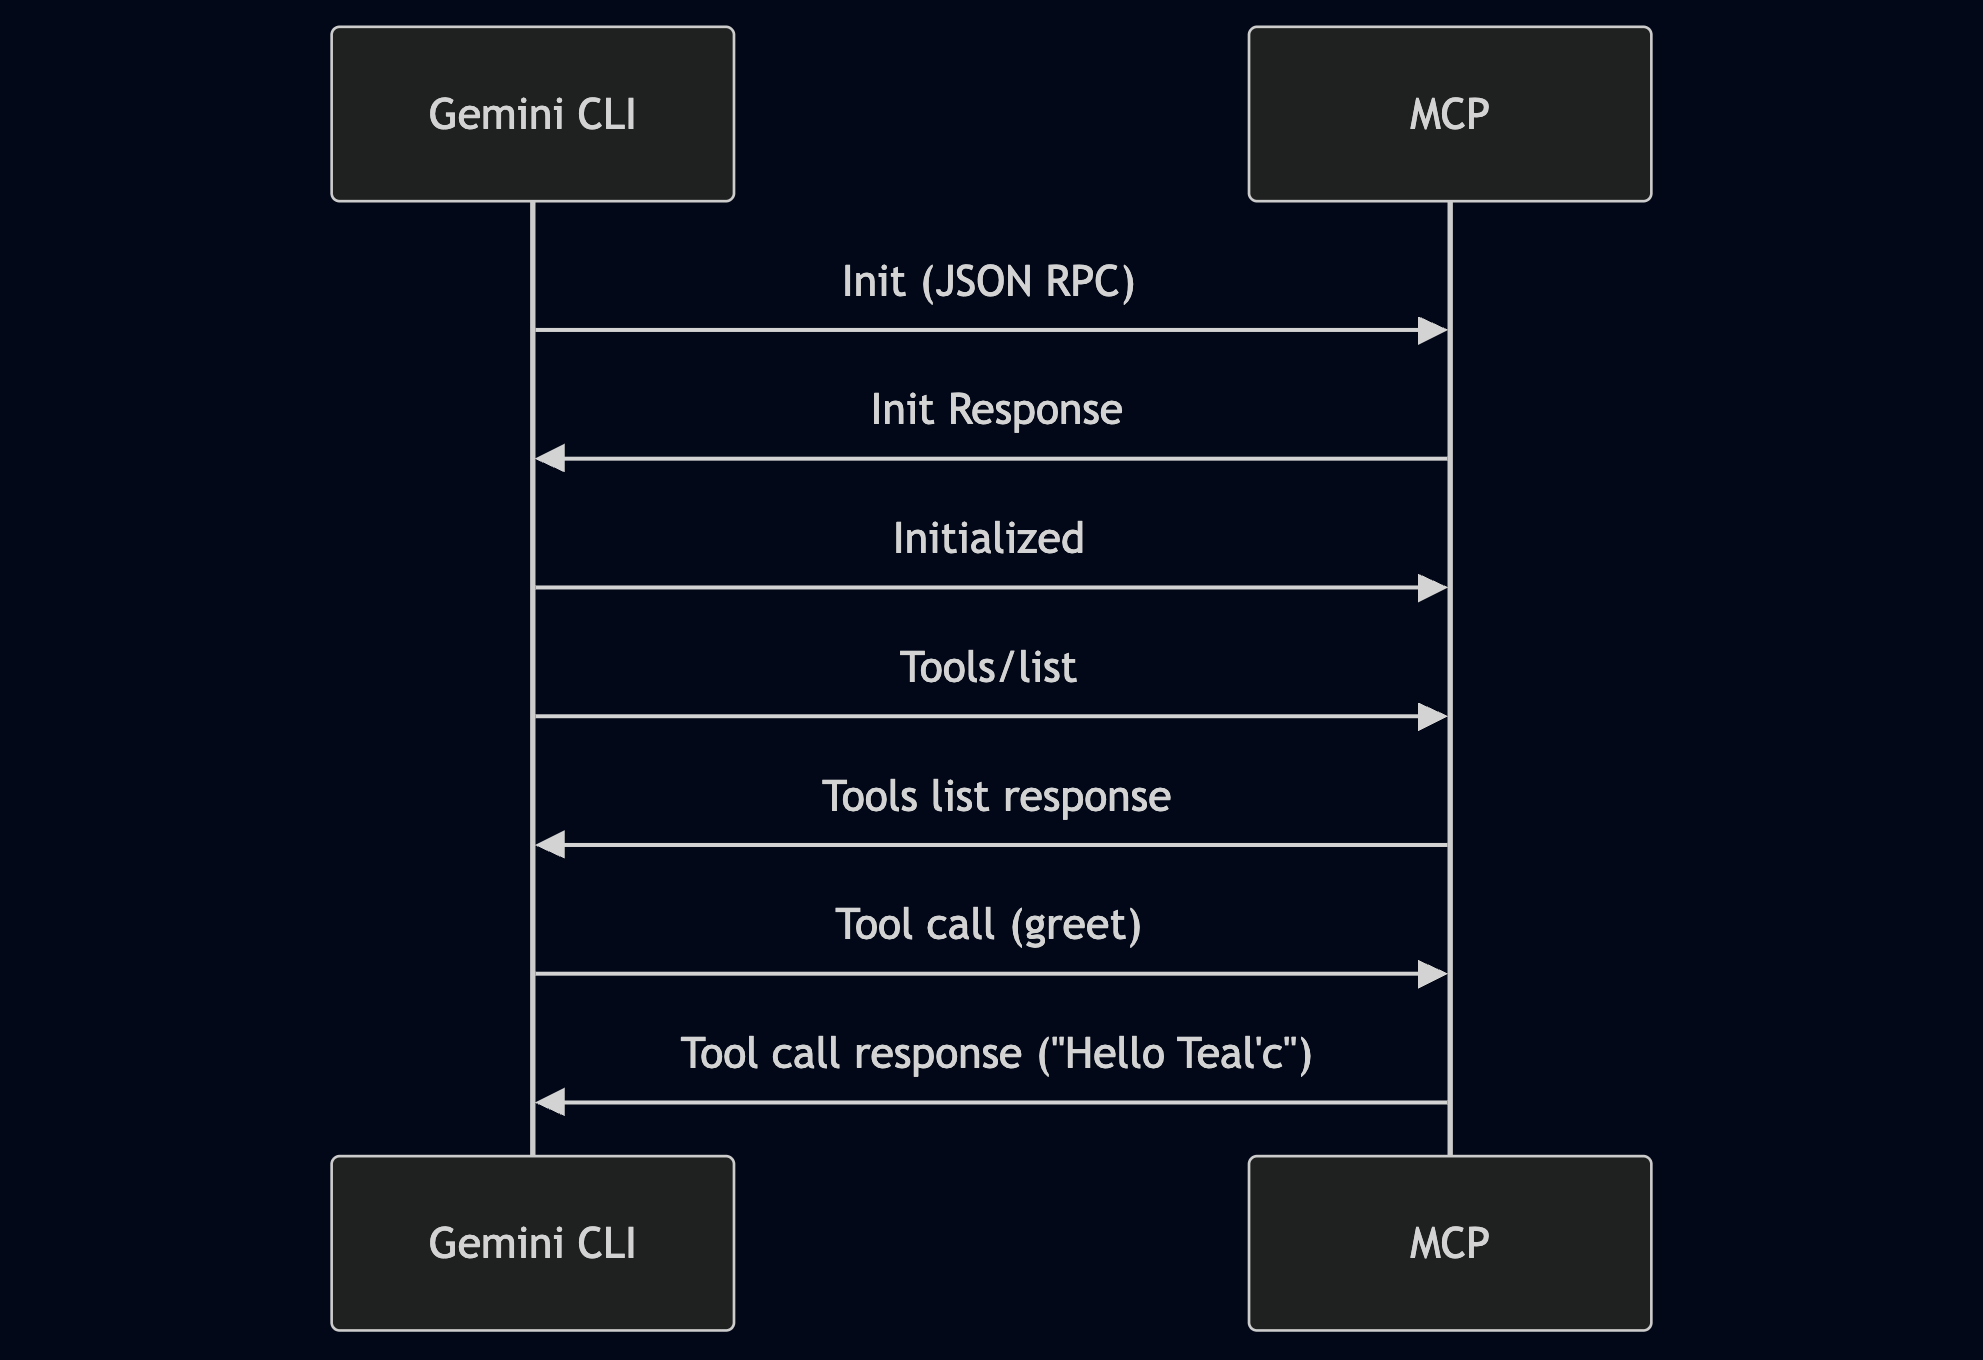
Here, the MCP server is started and requests are sent via stdin directly into the terminal, with responses received via stdout.
The process follows this structure (acting as “Gemini CLI”):
1. Example File
The file to run is in gemini-mcp-example/main.py and already defined. The main components are:
# ...
mcp = FastMCP("greeter")
# ...
@mcp.tool()
def greet(name: str) -> str:
    return f'Hello {name}!'
# ...
if __name__ == "__main__":
    # NOTE: stdio is the default.
    mcp.run(transport='stdio')
Crucially, the MCP server is initialized with mcp = FastMCP("greeter"), a tool
defined and decorated with @mcp.tool(), and finally run via mcp.run() using
the stdio protocol.
This will start a server that will receive commands from stdin and output them through stdout. The alternative is http but given the local execution environment, this is simpler.
2. Run file
To better understand how this works, a test run is performed:
NOTE: Ensure the virtual environment is activated (ex:
source .venv/bin/activate)
python gemini-mcp-example/main.py
3. Init communication
The protocol is initialized with version
2024-11-05
using stdin/stdout (the stdio protocol configured for the fast MCP server).
This functions by sending json strings back and forth. To test, paste the following exactly into the shell:
{"jsonrpc":"2.0","id":1,"method":"initialize","params":{"protocolVersion":"2024-11-05","capabilities":{"roots":{"listChanged":true},"tools":{"listChanged":true},"sampling":{},"elicitation":{}},"clientInfo":{"name":"ExampleClient","title":"ExampleClientDisplayName","version":"1.0.0"}}}
Output similar to the following should appear:
{"jsonrpc":"2.0","id":1,"result":{"protocolVersion":"2024-11-05","capabilities":{"experimental":{},"prompts":{"listChanged":false},"resources":{"subscribe":false,"listChanged":false},"tools":{"listChanged":false}},"serverInfo":{"name":"greeter","version":"1.10.1"}}}
NOTE: The json commands here and below must be pasted as is. Newlines are not permitted. If the formatting is incorrect, the server will just ignore the requests.
Subsequently, paste this to start the connection:
{"jsonrpc":"2.0","method":"notifications/initialized"}
This command must follow. Otherwise, the server will not finish the connection initialization (it’s a requirement of the protocol).
Next, input the following to list available tools:
{"jsonrpc":"2.0","method":"tools/list","id":1}
Output similar to the following should appear:
{"jsonrpc":"2.0","id":1,"result":{"tools":[{"name":"greet","description":"","inputSchema":{"properties":{"name":{"title":"Name","type":"string"}},"required":["name"],"title":"greetArguments","type":"object"},"outputSchema":{"properties":{"result":{"title":"Result","type":"string"}},"required":["result"],"title":"greetOutput","type":"object"}}]}}
A Stdio connection with an MCP server has been successfully established! To test calling the tool:
{"jsonrpc":"2.0","id":1,"method":"tools/call","params":{"name":"greet","arguments":{"name":"Teal'c"}}}
The following output should appear:
{"jsonrpc":"2.0","id":1,"result":{"content":[{"type":"text","text":"Hello Teal'c!"}],"structuredContent":{"result":"Hello Teal'c!"},"isError":false}}
This demonstrates the setup of an MCP server with Gemini.
Gemini CLI will run the server as a child process and send commands to stdin and receive responses from stdout using the stdio protocol.
Additional Challenge: Two Terminals (Linux Only)
To attempt this in separate terminals, run the command with:
cat | python gemini-mcp-example/main.py
locate the PID with ps uxaw | grep gemini-mcp-example, and
send requests to /proc/$PROC_PID/fd/0 and read responses from
/proc/$PROC_PID/fd/1. Other methods exist, but this offers the simplest setup.
Gemini CLI
Integration with Gemini CLI.
Additional tools are required: node and Gemini CLI itself.
1. Install Node
2. Install Gemini CLI
npm install -g @google/gemini-cli
3. Gemini Extension
Add the Gemini extension (see instructions here):
git clone https://github.com/jrmlhermitte/gemini-mcp-example.git
mkdir -p $PWD/gemini/extensions
ln -s $PWD/gemini-mcp-example ~/.gemini/extensions
This will clone the github repo containing the extension and soft link it into the extensions directory.
4. Start Everything
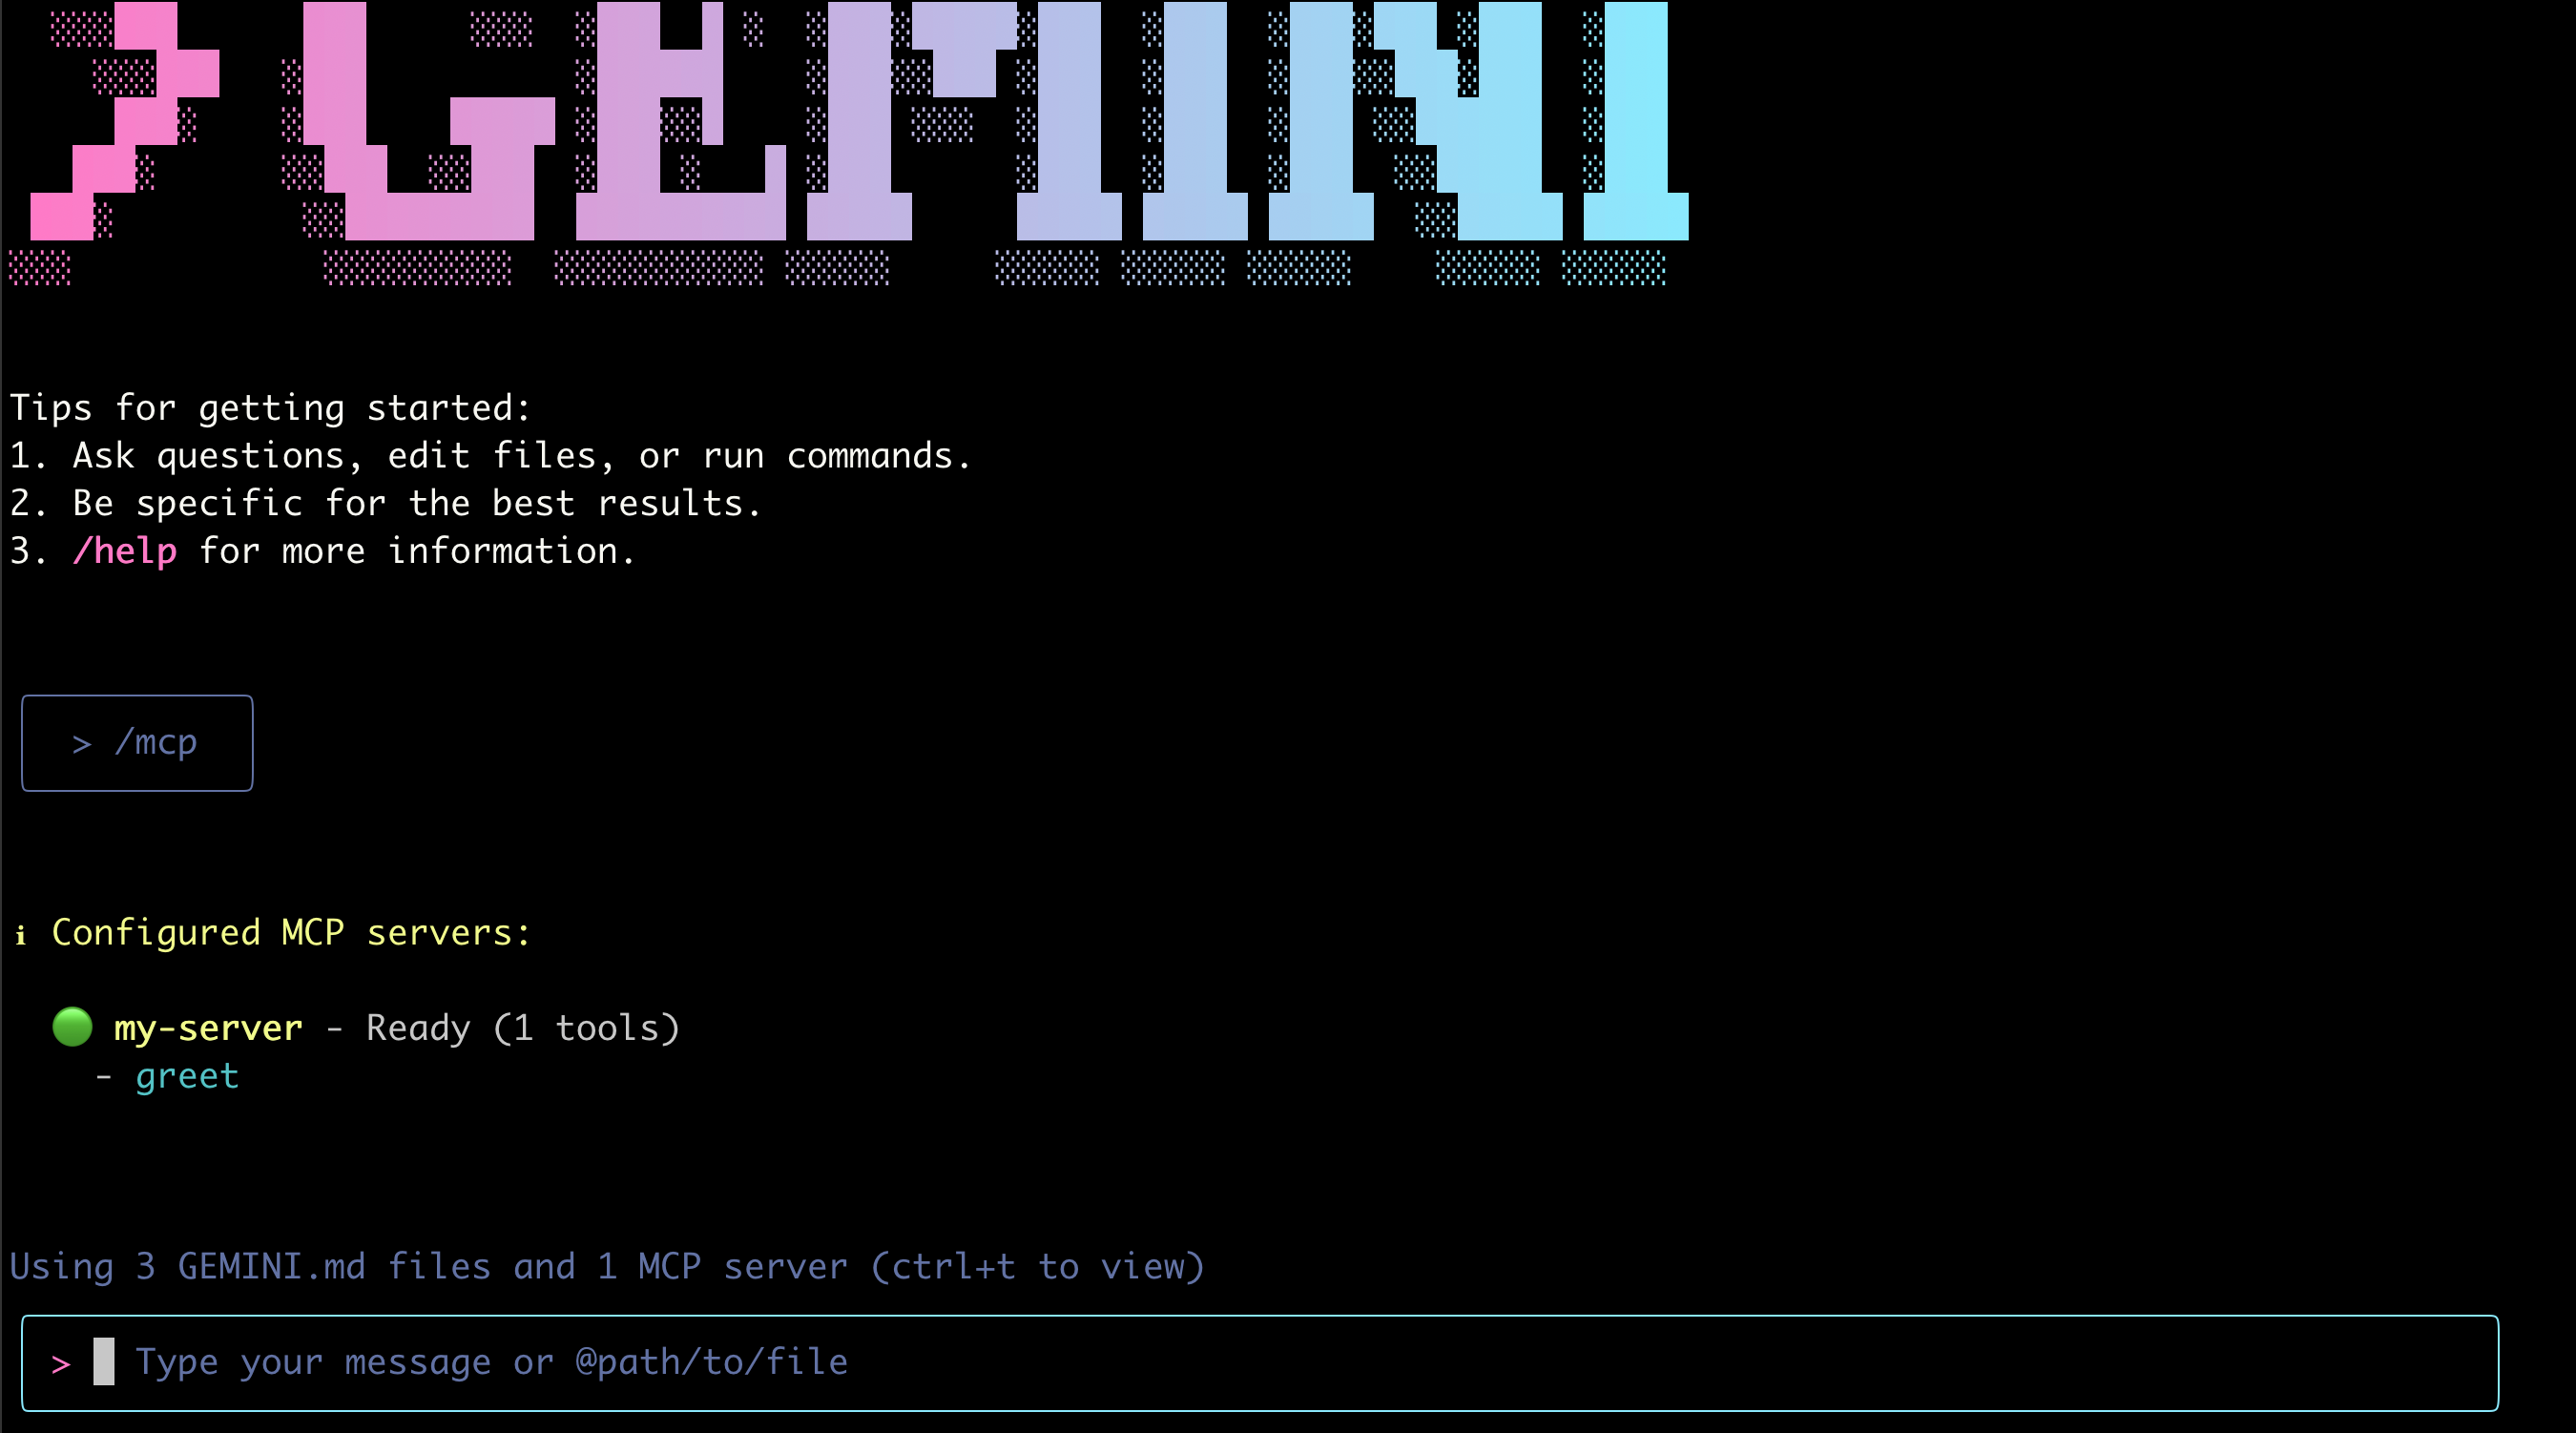
Start gemini and list mcp servers
gemini
Then type:
/mcp
The following should appear:
NOTE: Gemini must be started from the code folder. The reason is that the
extension runs python ./gemini-mcp-example/main.py.
To make this globally runnable, ensure the base python environment contains the
fastmcp library and that the gemini-extension.json refers to an absolute
path.
NOTE: First-time setups will also display some easy to follow setup steps.
5. Test Run
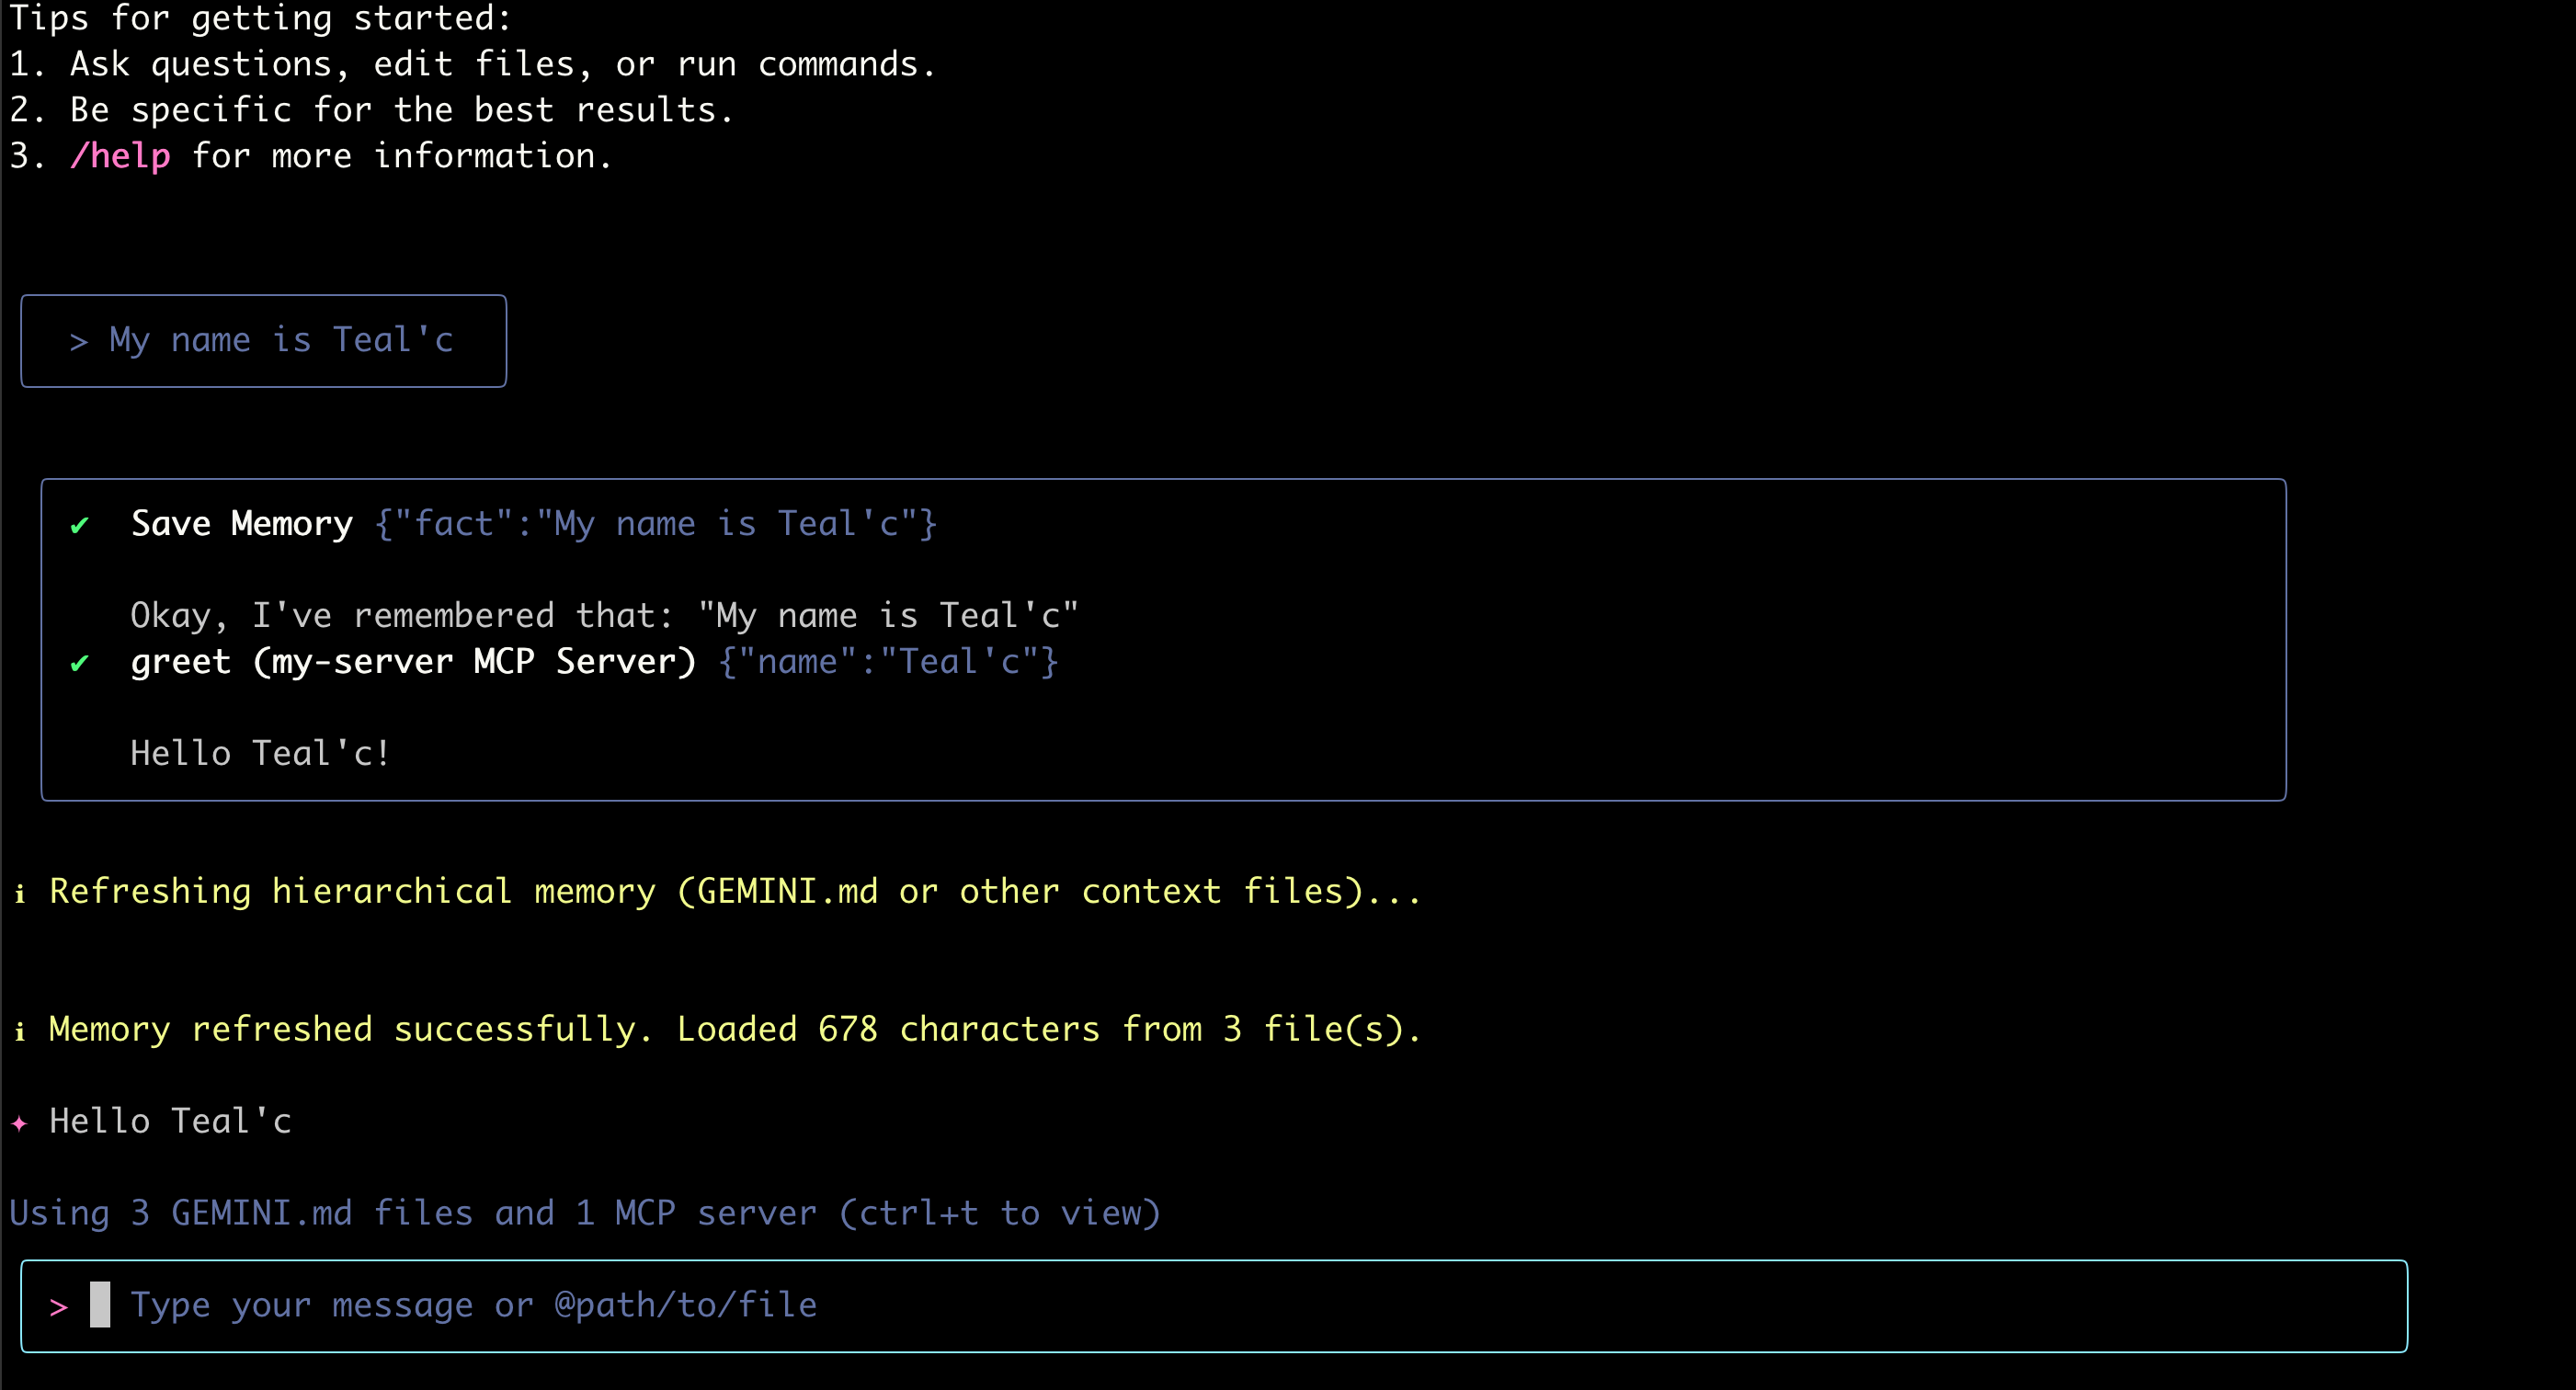
Input something like:
My name is Teal'c
Gemini should determine that calling the greeting tool is appropriate, given the
introduction. A request to call the tool should appear:
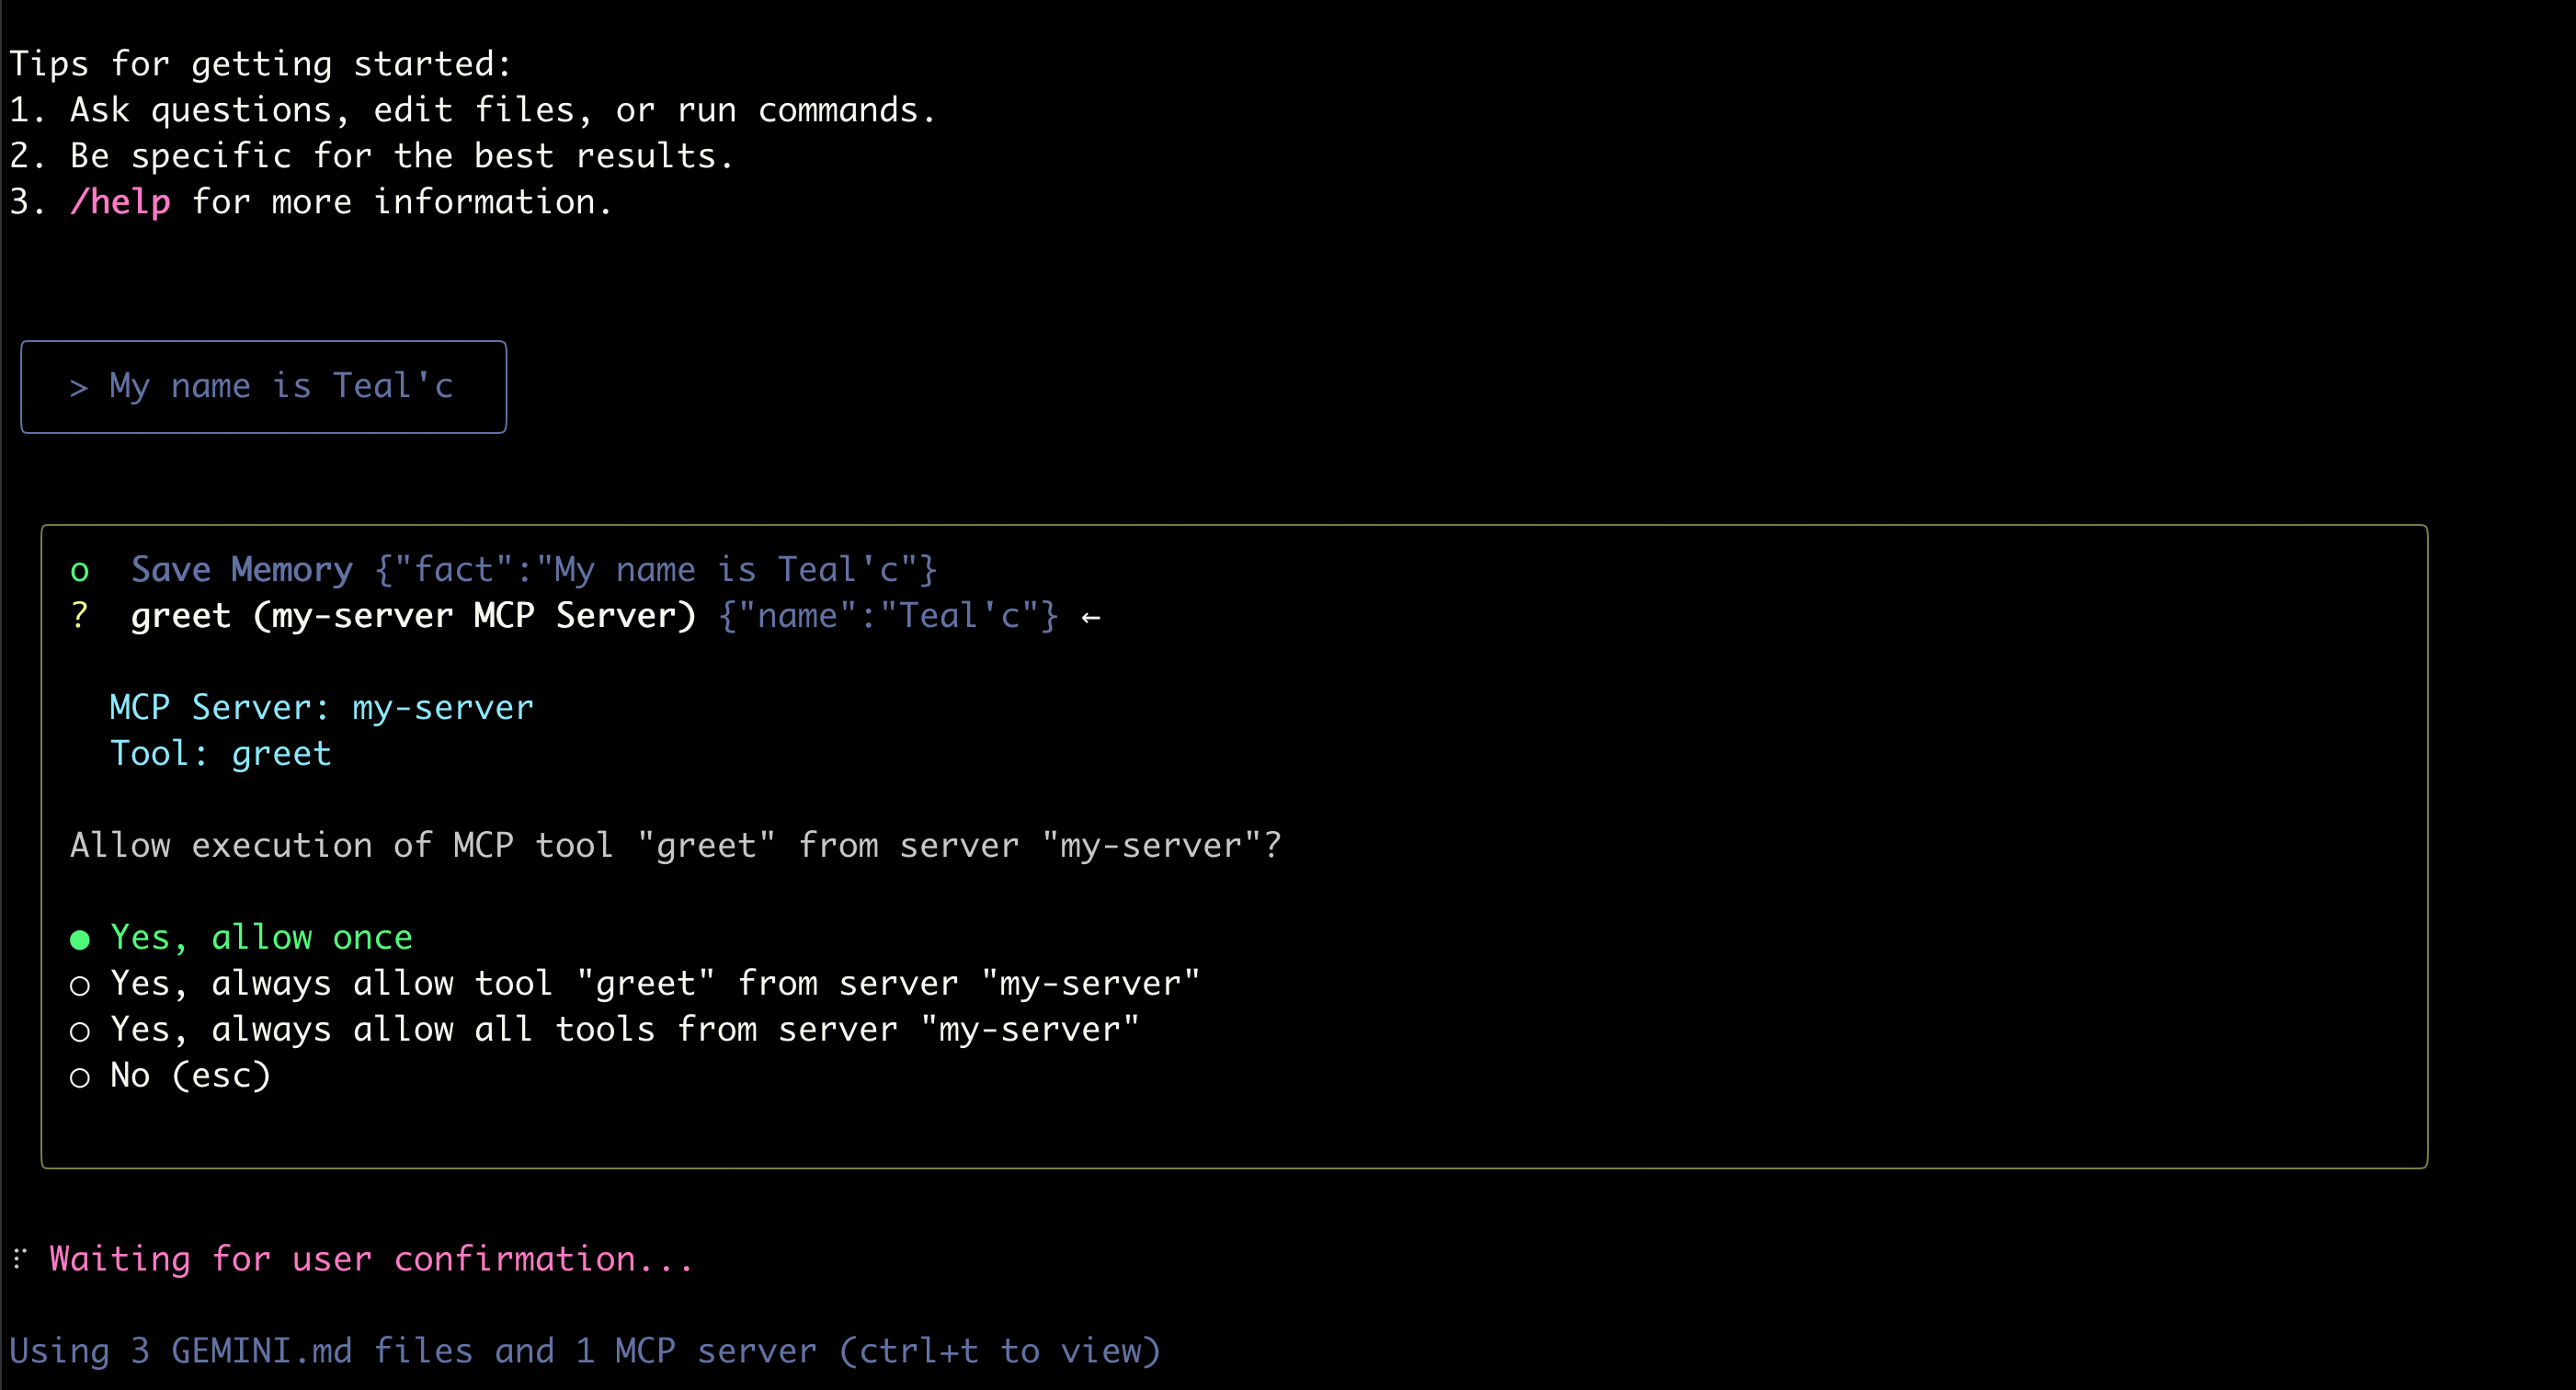
The tool should successfully execute.
Troubleshooting
Running into problems? Attempt running the MCP server manually to see if it’s able to start up:
source .venv/bin/activate
python gemini-mcp-example/main.py
(Also ensure to run source .venv/bin/activate before starting gemini; This runs in a local virtual environment.)
Where to go from here?
This guide goes beyond simple configuration by manually exposing the underlying protocol, providing a transparent blueprint for connecting Gemini to custom tools. With the core communication channel now demystified and established, the only remaining limit is the complexity of the tools deployed.
Citation
@misc{jlhermitte2025geminimcp,
  title={MCP With Gemini},
  author={Julien R. Lhermitte},
  year={2025},
  howpublished={\url{https://jrmlhermitte.github.io/2025/07/03/gemini-mcp.html}}
}